 Solar Energy News!
-
Recent Posts
Recent Comments
- shanehamilton on The Effect of Shade on the Main Solar Array
- Greg Schultea on The Effect of Shade on the Main Solar Array
- shanehamilton on Photo Gallery of Progress So Far
- James on Photo Gallery of Progress So Far
Meta
Archives
Tigo Optimizers Show The Sun’s Reflection From House In Early Hours Increases Production.
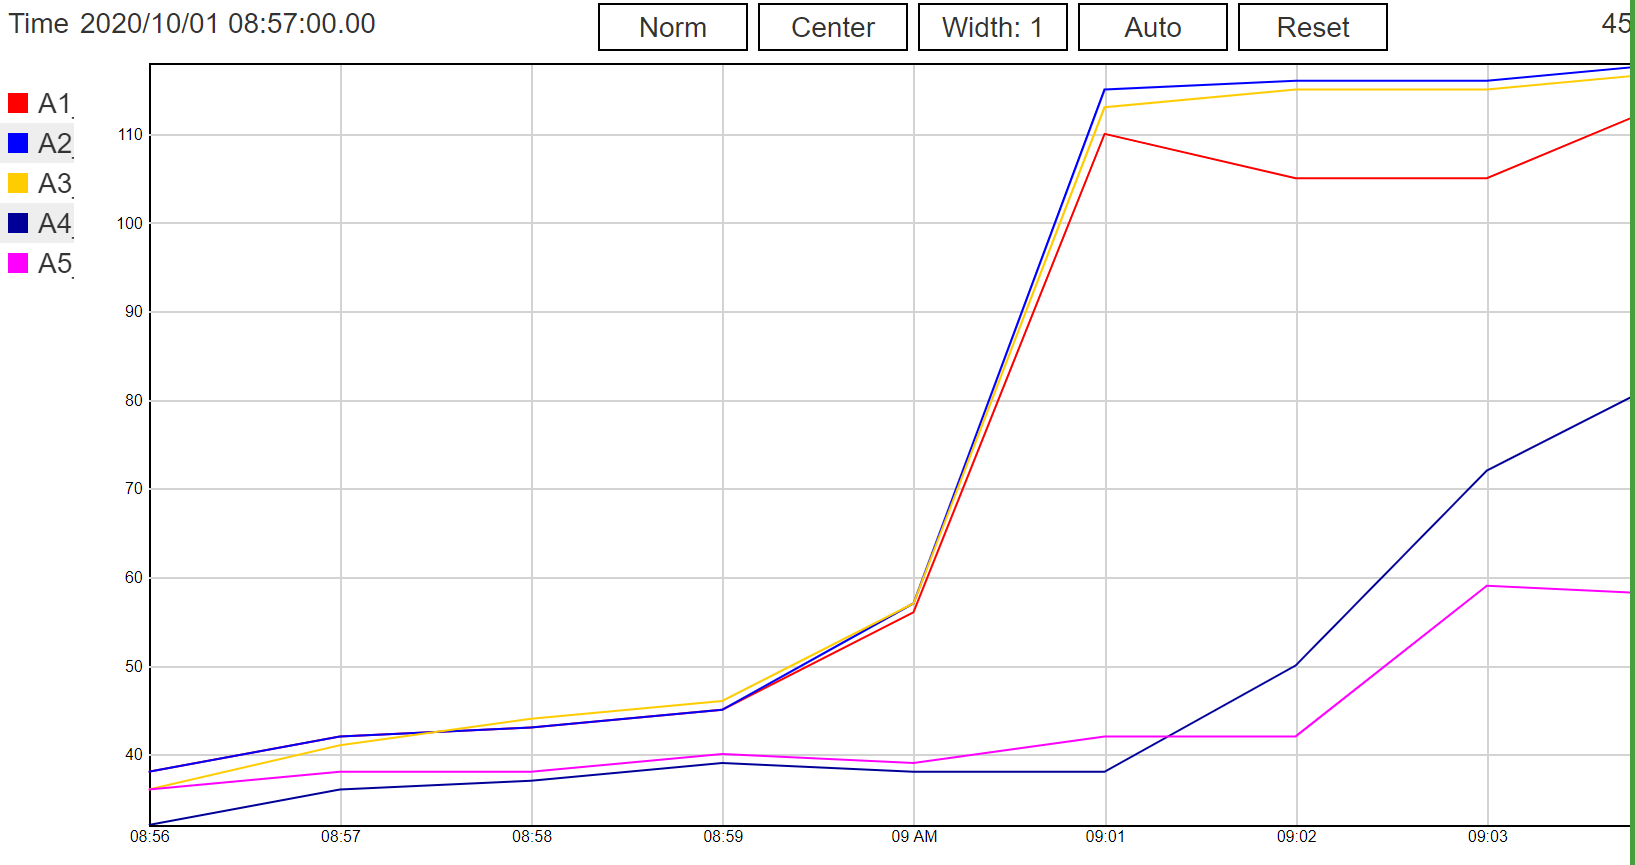
I installed TIGO panel optimizers on 5 panels nearest my house in my ground mount array. Day one and the data is already enlightening. You can see the early sunrise reflecting off the second story of my home. The top panels, A1-A2 and some of A3 are getting a slight headstart in energy production. The A4 and A5 panels are not getting the reflection and it shows. I’m looking forward to additional data that will be gathered in the coming weeks. I purchased this system as a test and so far, I’m impressed. For the price, simplicity, and flexibility it cannot be beaten. Let’s hope it proves to be reliable.
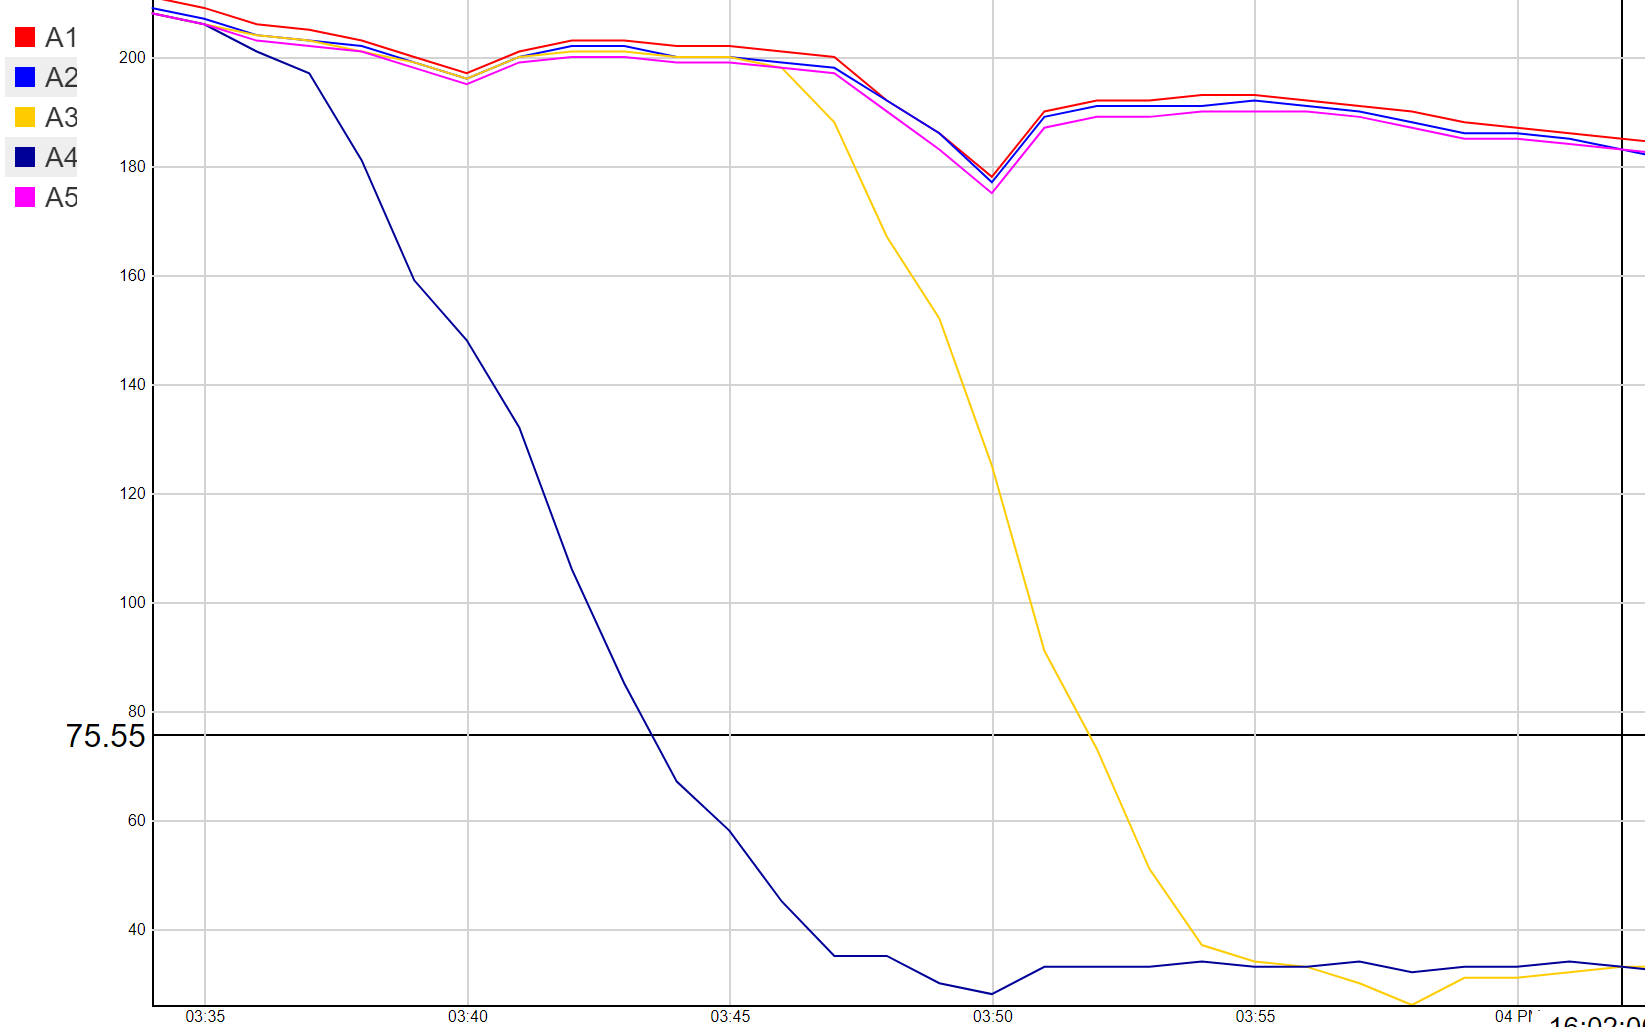
In the second screen capture, you will see the shade that starts to hit my panels from the top of my second story. With the TIGO Optimizers, A4 drops to almost nothing, followed by A5. I do not have enough shade to warrant the cost of micro-inverters or SolarEdge HD Wave inverters. In fact, the cost of the TIGOs for the 5 panels was more than I will ever recover. However, I do get an additional 1Kw every 4 days which was much better than I expected. I love being able to see panel-level data and if you need Rapid Shutdown and optimization on all panels or just a few in your string, TIGO is an impressive product.
Posted in Uncategorized
Leave a comment
The Effect of Shade on the Main Solar Array
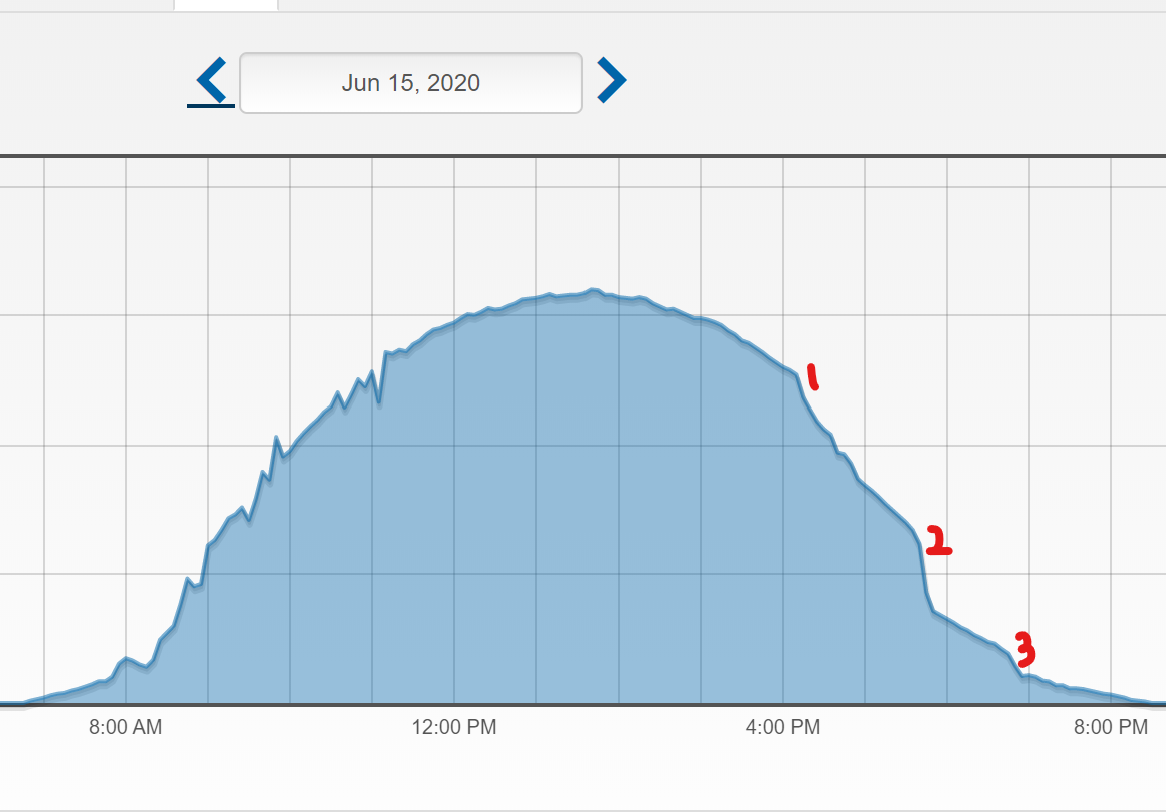
This chart shows daily production of the 25 x 325-watt panels where there are minimal clouds and less than ideal conditions for the array later in a summer evening. At around 4:15 pm (1), the first string of 5 panels begins a significant reduction in power. At 5:41 the second string of 10 panels begins to shade and quickly drops production of that string. Finally, at 6:47 pm, the last string of 10 panels begins to shade.
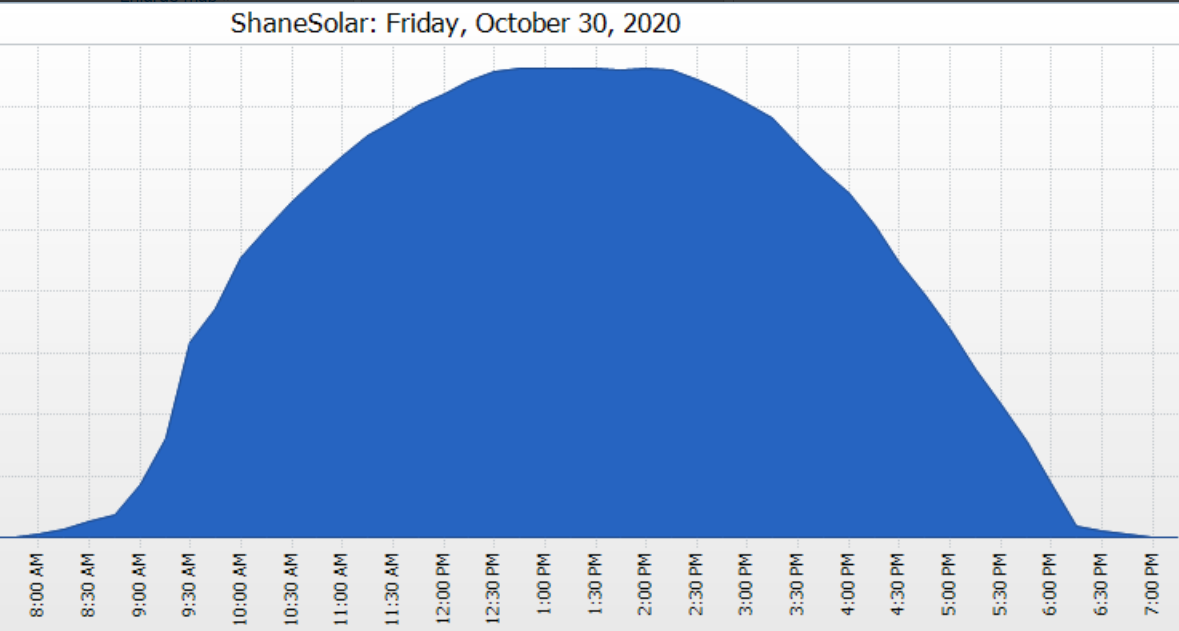
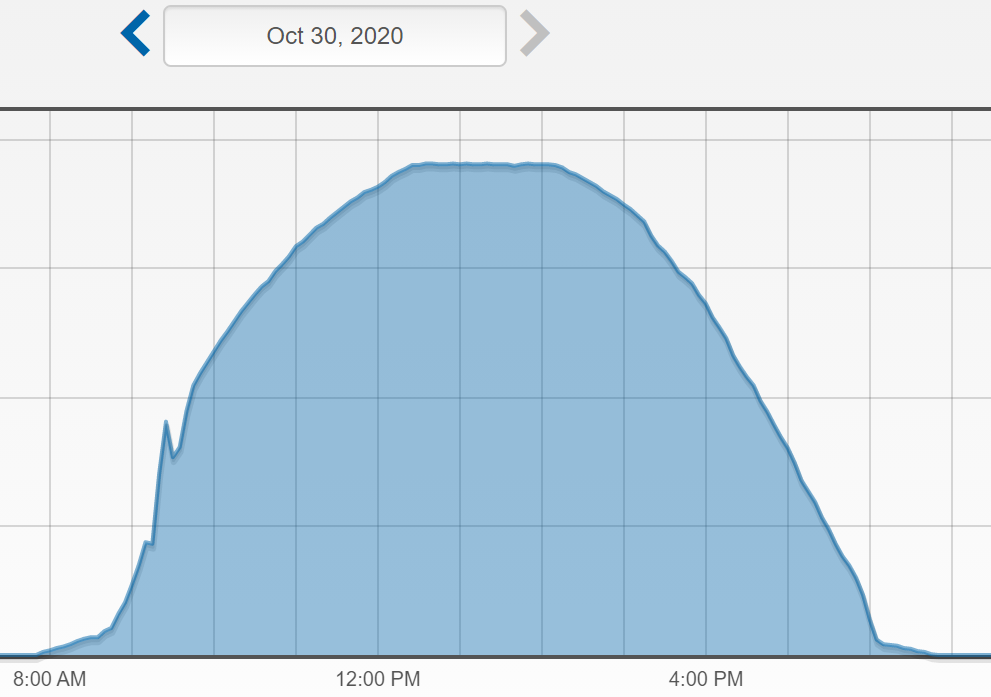
During a typical Florida summer day, the evening hours sometimes produce heavy clouds and thunderstorms. This reduces the impact of the second story shading the solar panels. The design of the ground mount with a 15′ back height also helps to continue producing as late into the day as possible in the current configuration. Based on my calculations, on a cloudless summer day, I’m losing about 4% of the possible energy production for the day. I can calculate loss fairly accurately as I have a smaller, second array that is not affected by the shade of the 2nd story. I’ve considered optimizers, however, I like the simplicity of the strings and I’m not convinced it will provide much of an improvement over the current configuration.
With Duke Energy providing a credit bank of unused kilowatts, it may have been better to reduce the panel angle to 5-10 degrees. This would likely improve summer production and reduce the shade to the lower edge of the ground mount which is currently 8′ in height. I could then use the kw credits later in the year. Duke will zero out the credits and pay me .06 for them a the end of the calendar year so maybe it’s best at 21 deg.
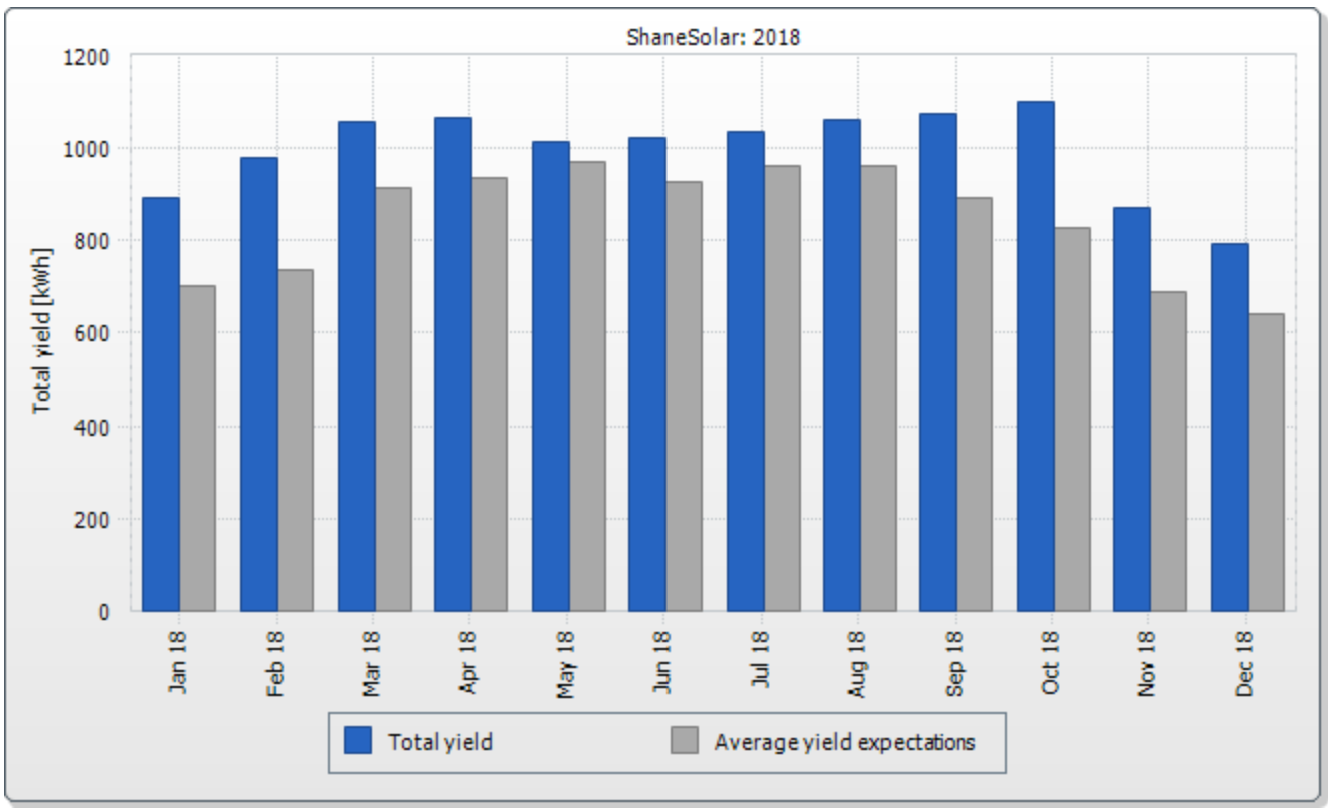
The design of the array puts the panels at 21 degrees to distribute efficiency through summer and winter. The panels are cooler in fall and spring. With the reduced shade and 21-degree angle, the production in March and October exceeds that of a perfect summer day.
Posted in Uncategorized
2 Comments
Net Zero, Success!
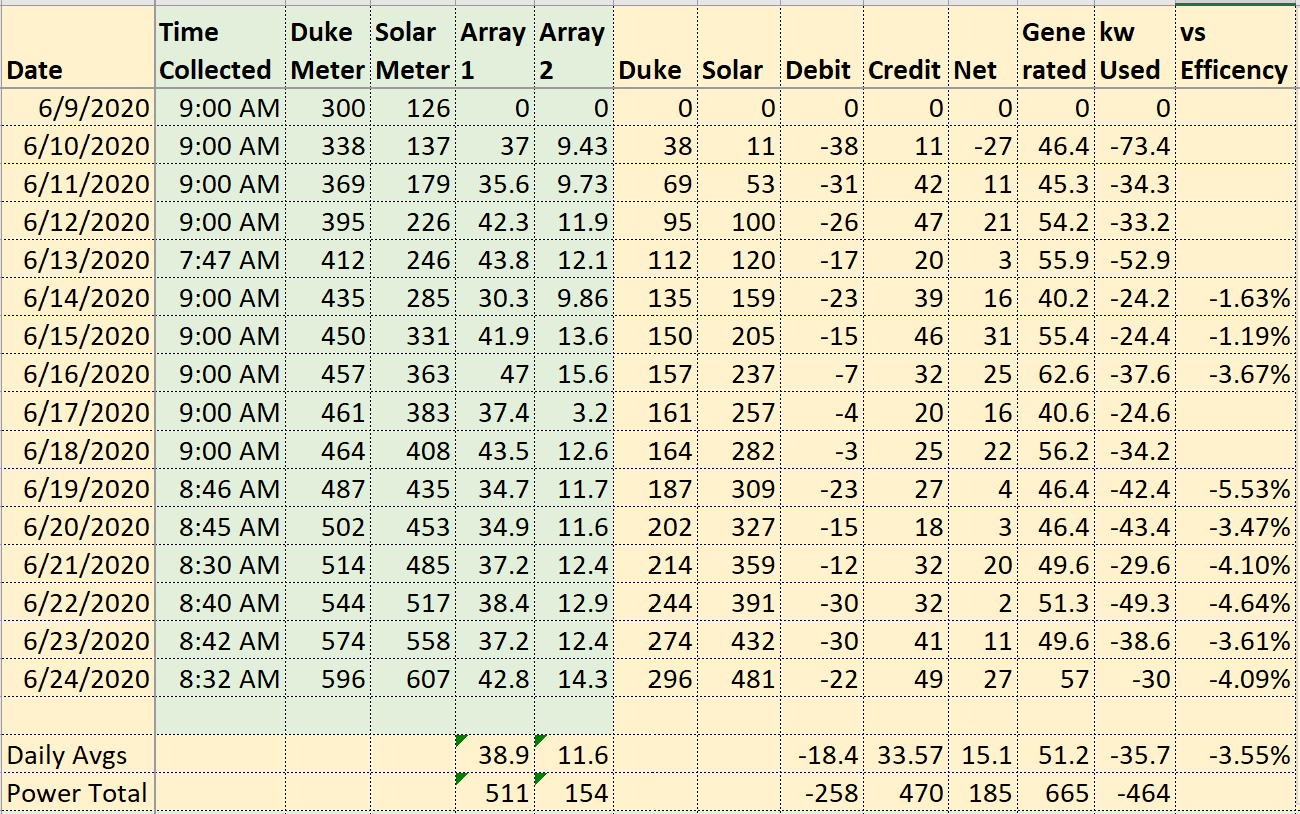
Over the course of a couple of years, we have added 21 SEER mini-split heat pumps, home automation to control every outlet, light and thermostat, a 3 hp variable speed pool pump, heavy insulation, inverter refrigerators, convection oven, and instant hot water heaters to reduce our energy consumption. We still have more we can do. New windows, more insulation, and better sealing would do a lot for our air conditioning costs. I’ve included a spreadsheet and chart with a couple of days in a hot month showing the kW we use vs. the kW we produce. We are charging our electric cars but with Covid-19, we only have to charge every couple of days due to not driving every day.
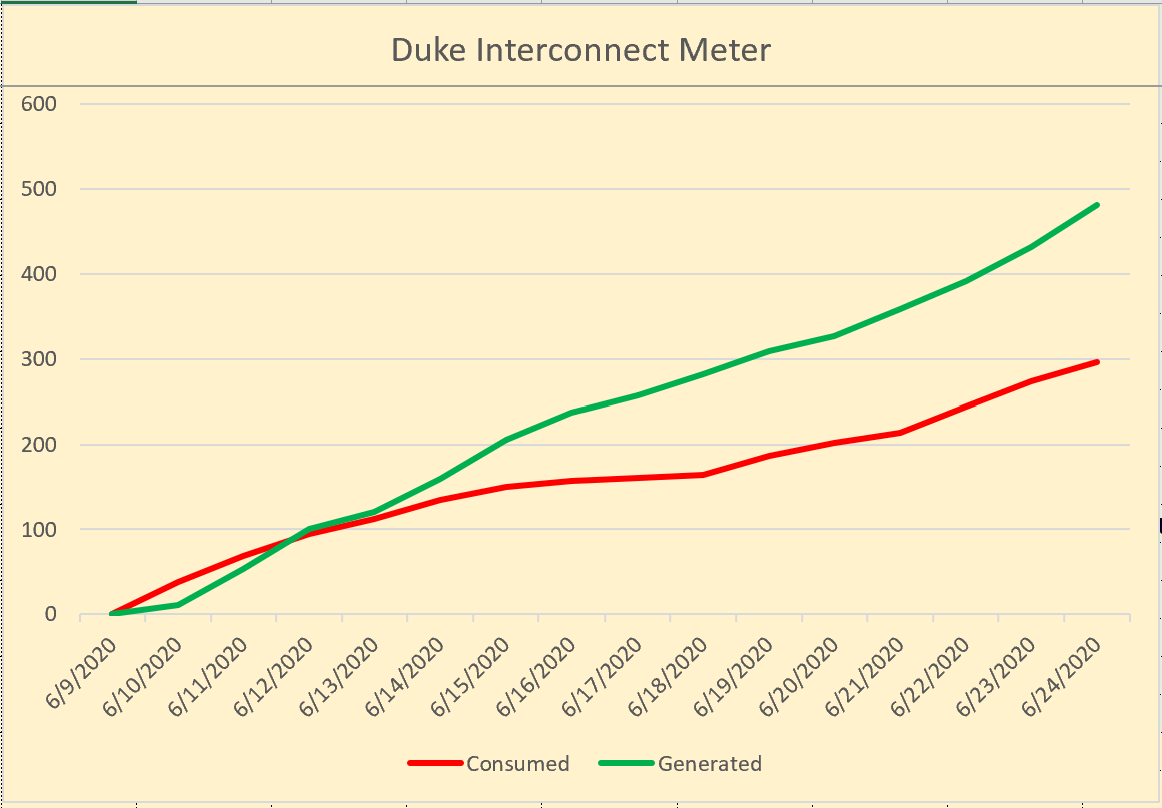
The fuel charge for Duke Energy is currently low but increases in kW cost have compensated for some of the drops in fuel costs. Currently $.13-.15 per kW. As fuel costs return to normal, we will likely be in the $.17 to .18 per kilowatt rate for over 1,000 kW and a couple of cents cheaper on < 1,000 kW. These rates include all costs billed. Duke will buy our extra power at .06 per kW at the end of each calendar year.
Considering we had a high of $500 and an average of $300 a month in electric costs prior to the changes and solar, we are very happy with the results and considering the jumps in kW costs over the last several years, our average costs would have been even higher.
Posted in Uncategorized
Leave a comment
Total Cost to Install Ground Mount with Materials Breakdown
| Supplier | Description | Quantity | Cost |
| Florida Industrial Products | A53 2"x 21′ Galvanized Grade A ERW Pipe $2.90ft | 12 | 781.96 |
| Florida Industrial Products | A53 2" x 21′ Galvanized Grade A ERW Threaded Pipe $3.10 | 4 | 260.4 |
| Clerk of the Circuit Court | Notice of Commencement | 1 | 18 |
| Municppal Services Parking | Center Garage | 1 | 1 |
| City Building Services | Electrical Permit | 1 | 460.88 |
| City Building Services | Building Permit | 1 | 120 |
| Ebay | Solar Array | 25 | 3520 |
| RES Supply | SMA 7.7US Sunny Boy Inverter | 1 | 1630 |
| RenVu | Unirac mounts (Includes Mistake Shipment) | 25 | 2358.93 |
| RenVu | Permit Documents | 1 | 504.12 |
| RenVu | Shipping Next Day | 1 | 80 |
| Frontier Concrete | 40,000lb, Fiber, Pump Rental, Delivery ($151 Yard) | 10 | 1510 |
| Ebay | Square D HU362RB 60 Amp 600v Disconnect | 1 | 99.99 |
| Harbor Freight | Shallow Well Pump | 1 | 120 |
| Home Depot | Receipt 1162 – River Pebble, Wood, PVC | 1 | 61.96 |
| Home Depot | Receipt 1163 – Saw Blade, Lumber | 1 | 95.21 |
| Home Depot | Receipt 1164 – U-Bolts | 1 | 11.75 |
| Home Depot | Receipt 1165 – Lumber | 1 | 38.85 |
| Home Depot | Receipt 1180 – Lumber, PVC, Fence Parts | 1 | 107.09 |
| Home Depot | Receipt 1181 – PVC | 1 | 17.8 |
| Home Depot | Receipt 1182 – PVC | 1 | 75.26 |
| Home Depot | Receipt 1193 – 4" PVC Connector | 1 | 5.33 |
| Home Depot | Receipt 1194 – 4" PVC Pipe | 1 | 25.98 |
| Home Depot | Receipt 1195 – Paint, 4" PVC, Screws, Lumber, Stakes, Post Hole Digger, Sledge Hammer, River Pebbles, U-Bolts | 1 | 169.3 |
| Home Depot | Receipt 1196 – Hammer, String, Stakes | 1 | 41.53 |
| Home Depot | Receipt 1197 – Marking Paint | 1 | 16.92 |
| Home Depot | Receipt 1467 – Diablo Sawzaw blades, PCF Cleanout Plug | 1 | 12.86 |
| Home Depot Return | Receipt 1468 – PVC | 1 | -32.75 |
| Home Depot | Receipt 1566 – Wheel Barrow, Shovel, Trowel | 1 | 102.63 |
| Home Depot | Receipt 1599 – Dark Thread Cutting Oil | 1 | 7.46 |
| Home Depot Rental | Auger | 1 | 99 |
| Misc | 100 | ||
| Total | 12421.46 | ||
| Federal Rebate | -3726.30 | ||
| Actual Cost | 8695.16 |
Posted in Uncategorized
Leave a comment
Video of the solar panels going up. 15 foot high on backside.
Posted in Uncategorized
Leave a comment
Shallow Well Using a $120 Pump from Harbor Freight
As an update to my previous post, I decided to try option #4, a shallow well to pump the water out of the ground so that I can dig an additional two feet. I really didn’t expect this to work but I found the following pump on harbor freight with a 20% off coupon. After determining that it would cost about $150 for pump and plumbing I figured it was worth a shot. The video of the installation and result is below.
-
- This is the Harbor Freight Shallow Well Pump with Tank and Pressure Shutoff Valve running. $120 with 20% off coupon
-
- Water being pumped from a well that was put 10-15 feet down in Florida.
-
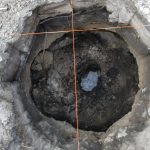
- This is a photo of a hole before the pump was turned on.
-
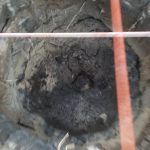
- This is a photo of a hole after the pump was running for about 45 minutes.
Here is a video of the install, pump running and visual of the holes.
Update 8/11/2017
After three days of running the pump, the water has been removed from the holes and I’m able to dig the 53 inch depth required for the array poles. The engineers also came back with a solution to put 24″ x 24″ footers with rebar spanning the distance of each pair of poles. This sounds like a very sturdy solution but one that would have been significant in both time and money so I”m happy to report the shallow well is doing its job.
Florida Recent Heavy Rain Didn’t Agree with Engineering
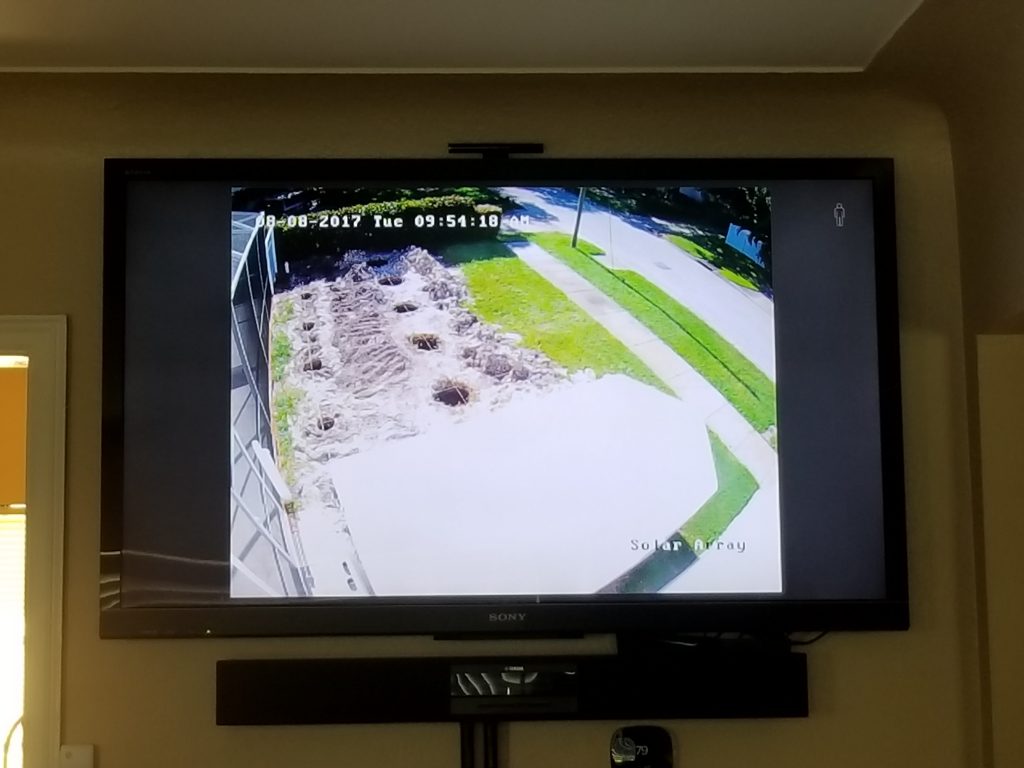
While I await the engineers to provide their expertise, I watch my security camera while daydreaming about this system becoming a reality. Here is a photo of my view as I sit on the couch writing this documentation.
We tried to dig our twelve holes but at 42″ deep ran into water. Digging any further caused the hole to collapse. There are several options at this point. In the following order;
- Increase the width of the hole and decrease the depth. The downside is that I would need more cement to hold the array and more area to dig with the 140 mph wind load requirement in the area. With the design I originally chose I would be close to 25,000 lbs of cement.
- Put a 12″ cement footer above the ground. I’m waiting for engineering to see if this is an option. Not ideal and may not meet the engineering requirements as the footer is partially above ground. I will wait to see what engineering gives as an option.
- Lower the height of the solar array. I have spent the time, money and energy to put the array 8 foot high on the south facing side or lowest point. Depending on the extra effort and cost of the first option, I may choose this compromise. I am waiting on the engineers to provide the specifics.
- Install a shallow well and pump the water over a period of time and dig the extra 13 inches required by the original engineering specifications. This will take more time and several hundred dollars of equipment. If I knew for sure this would work, I would probably use this option.
I also have a video of the holes being dug up to this point. The left side or north side holes are just 12 inches by 42 inches deep as we wait for engineering. The holes on the right or south side are ~24 inches wide by 42 inches deep.
Update 8/11/2017:
Engineering came back with the requirements for option 1.
- 24” diameter x 36” deep concrete footings at each post location.
- 24” x 24” concrete grade beam installed between leg pair footings
- Reinforcing steel is required
Option 2 was not an option as it needs to be buried to meet 140mph wind load requirements.
Option 3 was not really an option as I have too much time and money invested at this point and I really want the array as high as possible.
Option 4 was the first option I tried and it has worked so far. I think this is the route I’m going to take moving forward.
Unirac Engineering Saved Me Some Money!
Unirac designed and engineered my Solar Array in a 5 x 5 grid with 72 cell horizontally arranged panels with an 8 foot height on the low edge (south side) of the array. The reason for placing the ground mount at least 8 foot off the ground was to minimize shade coming from the second story of the house. An additional benefit is that it allows access under the panels to store kayaks or other items. It also provides enough light to grow shade St. Augustine grass and maintain the yard. My roof has 11 facets making a roof mounted system inefficient.
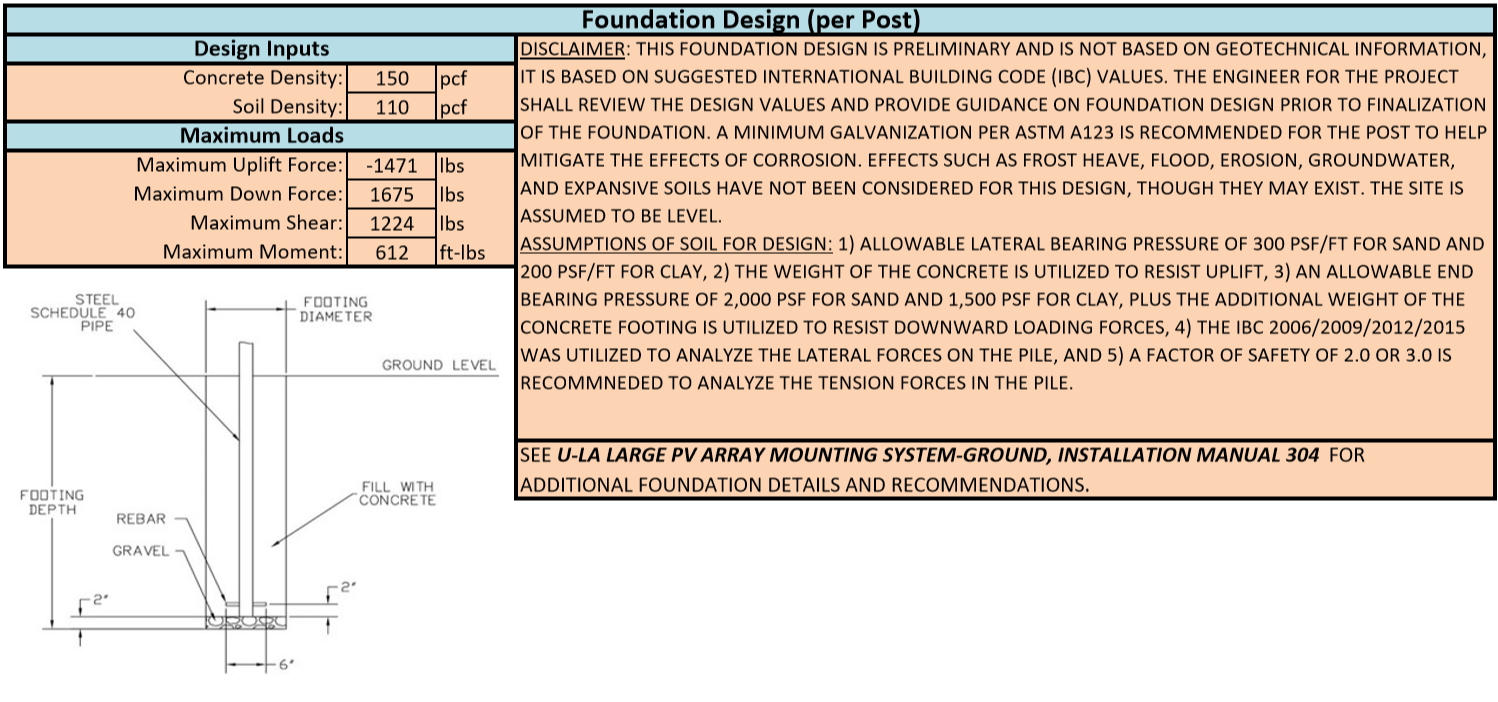
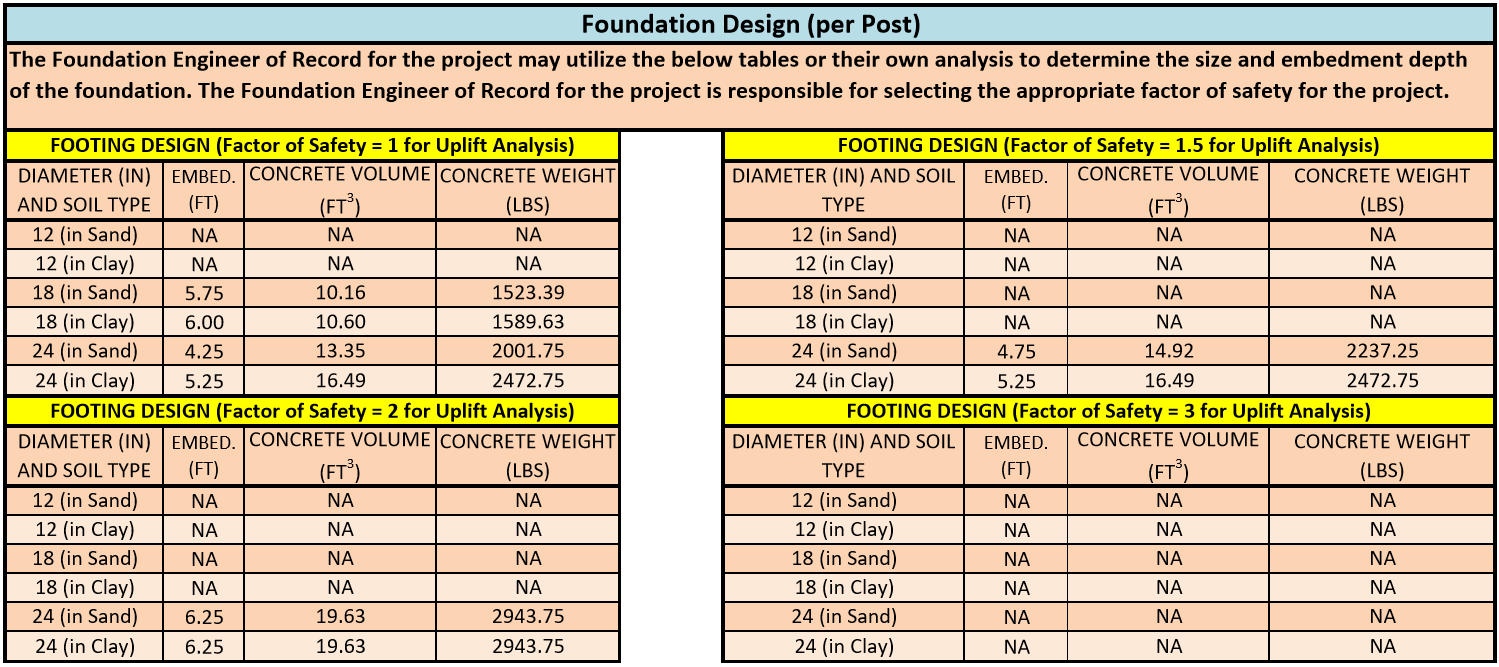
I ran into a problem with the materials required based on the engineering designs. The design called for 12 ASTM A53 2″ Galvanized Type E Grade B pipes to meet the 140mph wind load. The pipes were 21′ long and weighed over 1200lbs. This required that I try and source them locally. After ordering the pipe from a local company the pipes arrived. However, they were stamped as Grade A. Grade A pipe has a lower carbon content and I believe it does not the same heat treating. The result is a lower tensile strength and cheaper product generally imported, in my case from Vietnam. After contacting the supplier, domestic pipe needed to be ordered at a cost of more than double to meet Grade B standards. I contacted Unirac and asked them to re-engineer the system and determine if Grade A would meet the 140mph wind load requirements. A couple of days later they informed me that Grade A would handle the wind load and sent me an updated engineering document.
The excavation process has begun and the Unirac ground mount system has been ordered. I expect it to take several weeks to get the parts and inspection so that I can start racking and mounting. Below are a couple of pages from the engineering documents given to me by Unirac showing the foundation design.
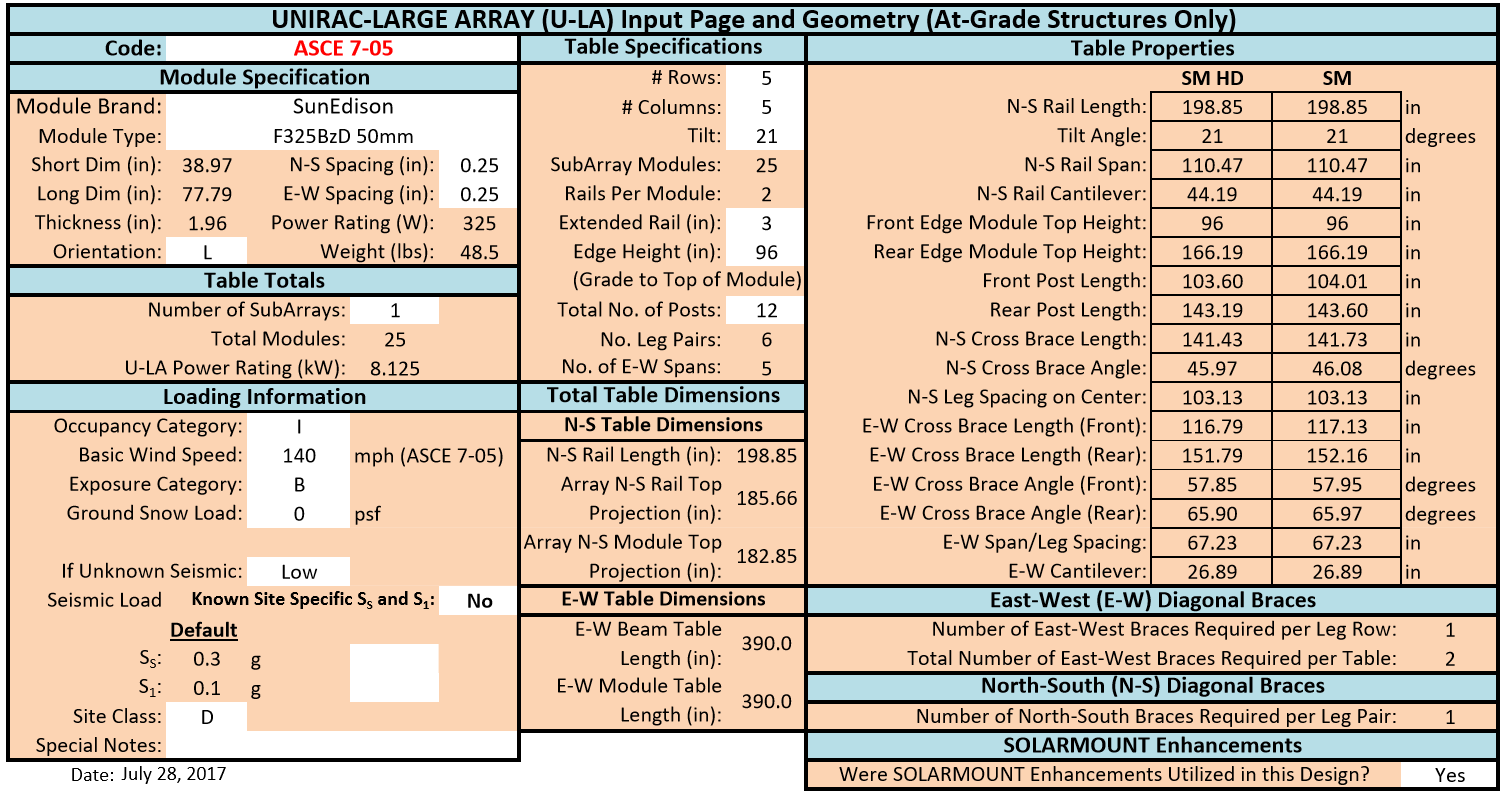
Update 8/8/2017
Unirac came back with new engineering documents showing the grade A pipe as acceptable in the design. This saved me the hassle of returning the grade A pipe and also well over a thousand dollars as grade B pipe is domestic and much more expensive pipe.
Florida Solar Ground Mount Permit In Hand!
The building department offered a free charge!
I spent the early part of the day putting together my permit documents and engineering plans from RenVu, Unirac, SunnyBoy (SMA) and SunEdision this morning and visited the Building Department in the afternoon.
After a little hiccup with zoning I was able to get to the permit department. I had printed the permitting document in color and bound it nicely. The first employee in the zoning office gave me the go ahead to permitting but required that I get two copies. I ran across the block to Fed Ex and had another copy printed and bound. The time and money I spent binding and formatting the document was mostly a waste as they scan everything in. I’m not sure why they needed two copies if they were going to scan it. When I came back the new zoning employee indicated that I needed a survey with the property lines. I had it in the document but the property lines had been erased. He also wrote in the permit request that I would need a fence to hide the array. I did not want to commit to a fence at this point as it would make it difficult to get my array at less than $1.00 per kilowatt. After 10 minutes of trying to explain that the fence would not hide the array as it was 8-12 feet in the air and the fence was only 6 feet high, he scratched the requirement off of the document.
The permitting office had no problem. They simply told me that had not seen an install ground mounted and definitely not one installed so high off the ground. He sent me to the cashier and $460.88 later, I’m officially a permit holder.
I filed my Notice-of-Commencement form the following Monday, July 24th, and I’m ready to begin the work. I will include video of the complete install. It will take me some time to get started. I have to remove a shed and it contents, chicken coop, a recently dead Canary Island Date Palm and a trailer loaded with junk.
Posted in Uncategorized
Leave a comment
Solar Panels Have Arrived
Sun Edison F325 BMD Monocrystaline solar panels have arrived. This was the biggest investment in my goal of installing a grid tied solar system for under $1.00 per watt. The delivery company could not figure out how to get the 1,390 pounds of silicone, glass and aluminum off the truck. I tried for almost an hour and finally decided to cut the box open and pull them out one at a time. We had to carry them up an incline, into the garage, in the heat, rain and humidity. Two and a half hours later we were done. That’s my youngest son in the video and he was a great help. When you crunch the timeline on the video to a little over a minute, it is kind of depressing. It does not represent the difficulty of the task. Despite that, my confidence that I might actually be able to pull off a DIY solar grid tie installation is building. I will be applying for the permit tomorrow. I’ve often fought with hubris, let us hope this is not one of those fights.
Posted in Uncategorized
Leave a comment
My First Steps, Do It Yourself(DIY) Ground Mount Solar Power
Have you ever considered a solar installation? There are many options and technologies available and it can be difficult to traverse. This site is dedicated to my pursuit for a net zero, grid tied solar system installed in a residential home. I have considered and researched FSEC, engineering requirements, permit requirements, do it yourself (DIY) installs. I believe my experience might be of some value to the public so I bought a domain five years ago and I’m finally ready to to execute my grid tied solar installation.
I have also installed The Energy Detective (TED) with three ohm meters to show my gross and net energy uses in real time. I have made the live data available to the public using this dashboard. I purchased this system five years ago and have used it off and on but it’s now collecting data on a daily basis.
You can see the dashboard and live data by clicking here: Grid Tie Power*
* If you get the error: 414 Request-URI Too Long: Buffer overflow detected. This is a know issue with The Energy Detective (TED) do one of the following to access the Grid Tie Power website at http://www.gridtiepower.com:5000:
- Use Google Chrome Incognito feature. You can access it in Chrome using ctrl+shift+N.
- Clear your cookies.
Posted in Research
Tagged Energy Production, Energy Use, Solar, TED, The Energy Detective
Leave a comment